
ALPINE 51 HARDSHELL ROOFTOP TENT, ALUMINUM, 2 PERSON, BLACK
- Description
- Includes
- Specifications
- Instructions
- Quick Delivery Tips – Rooftop Tents
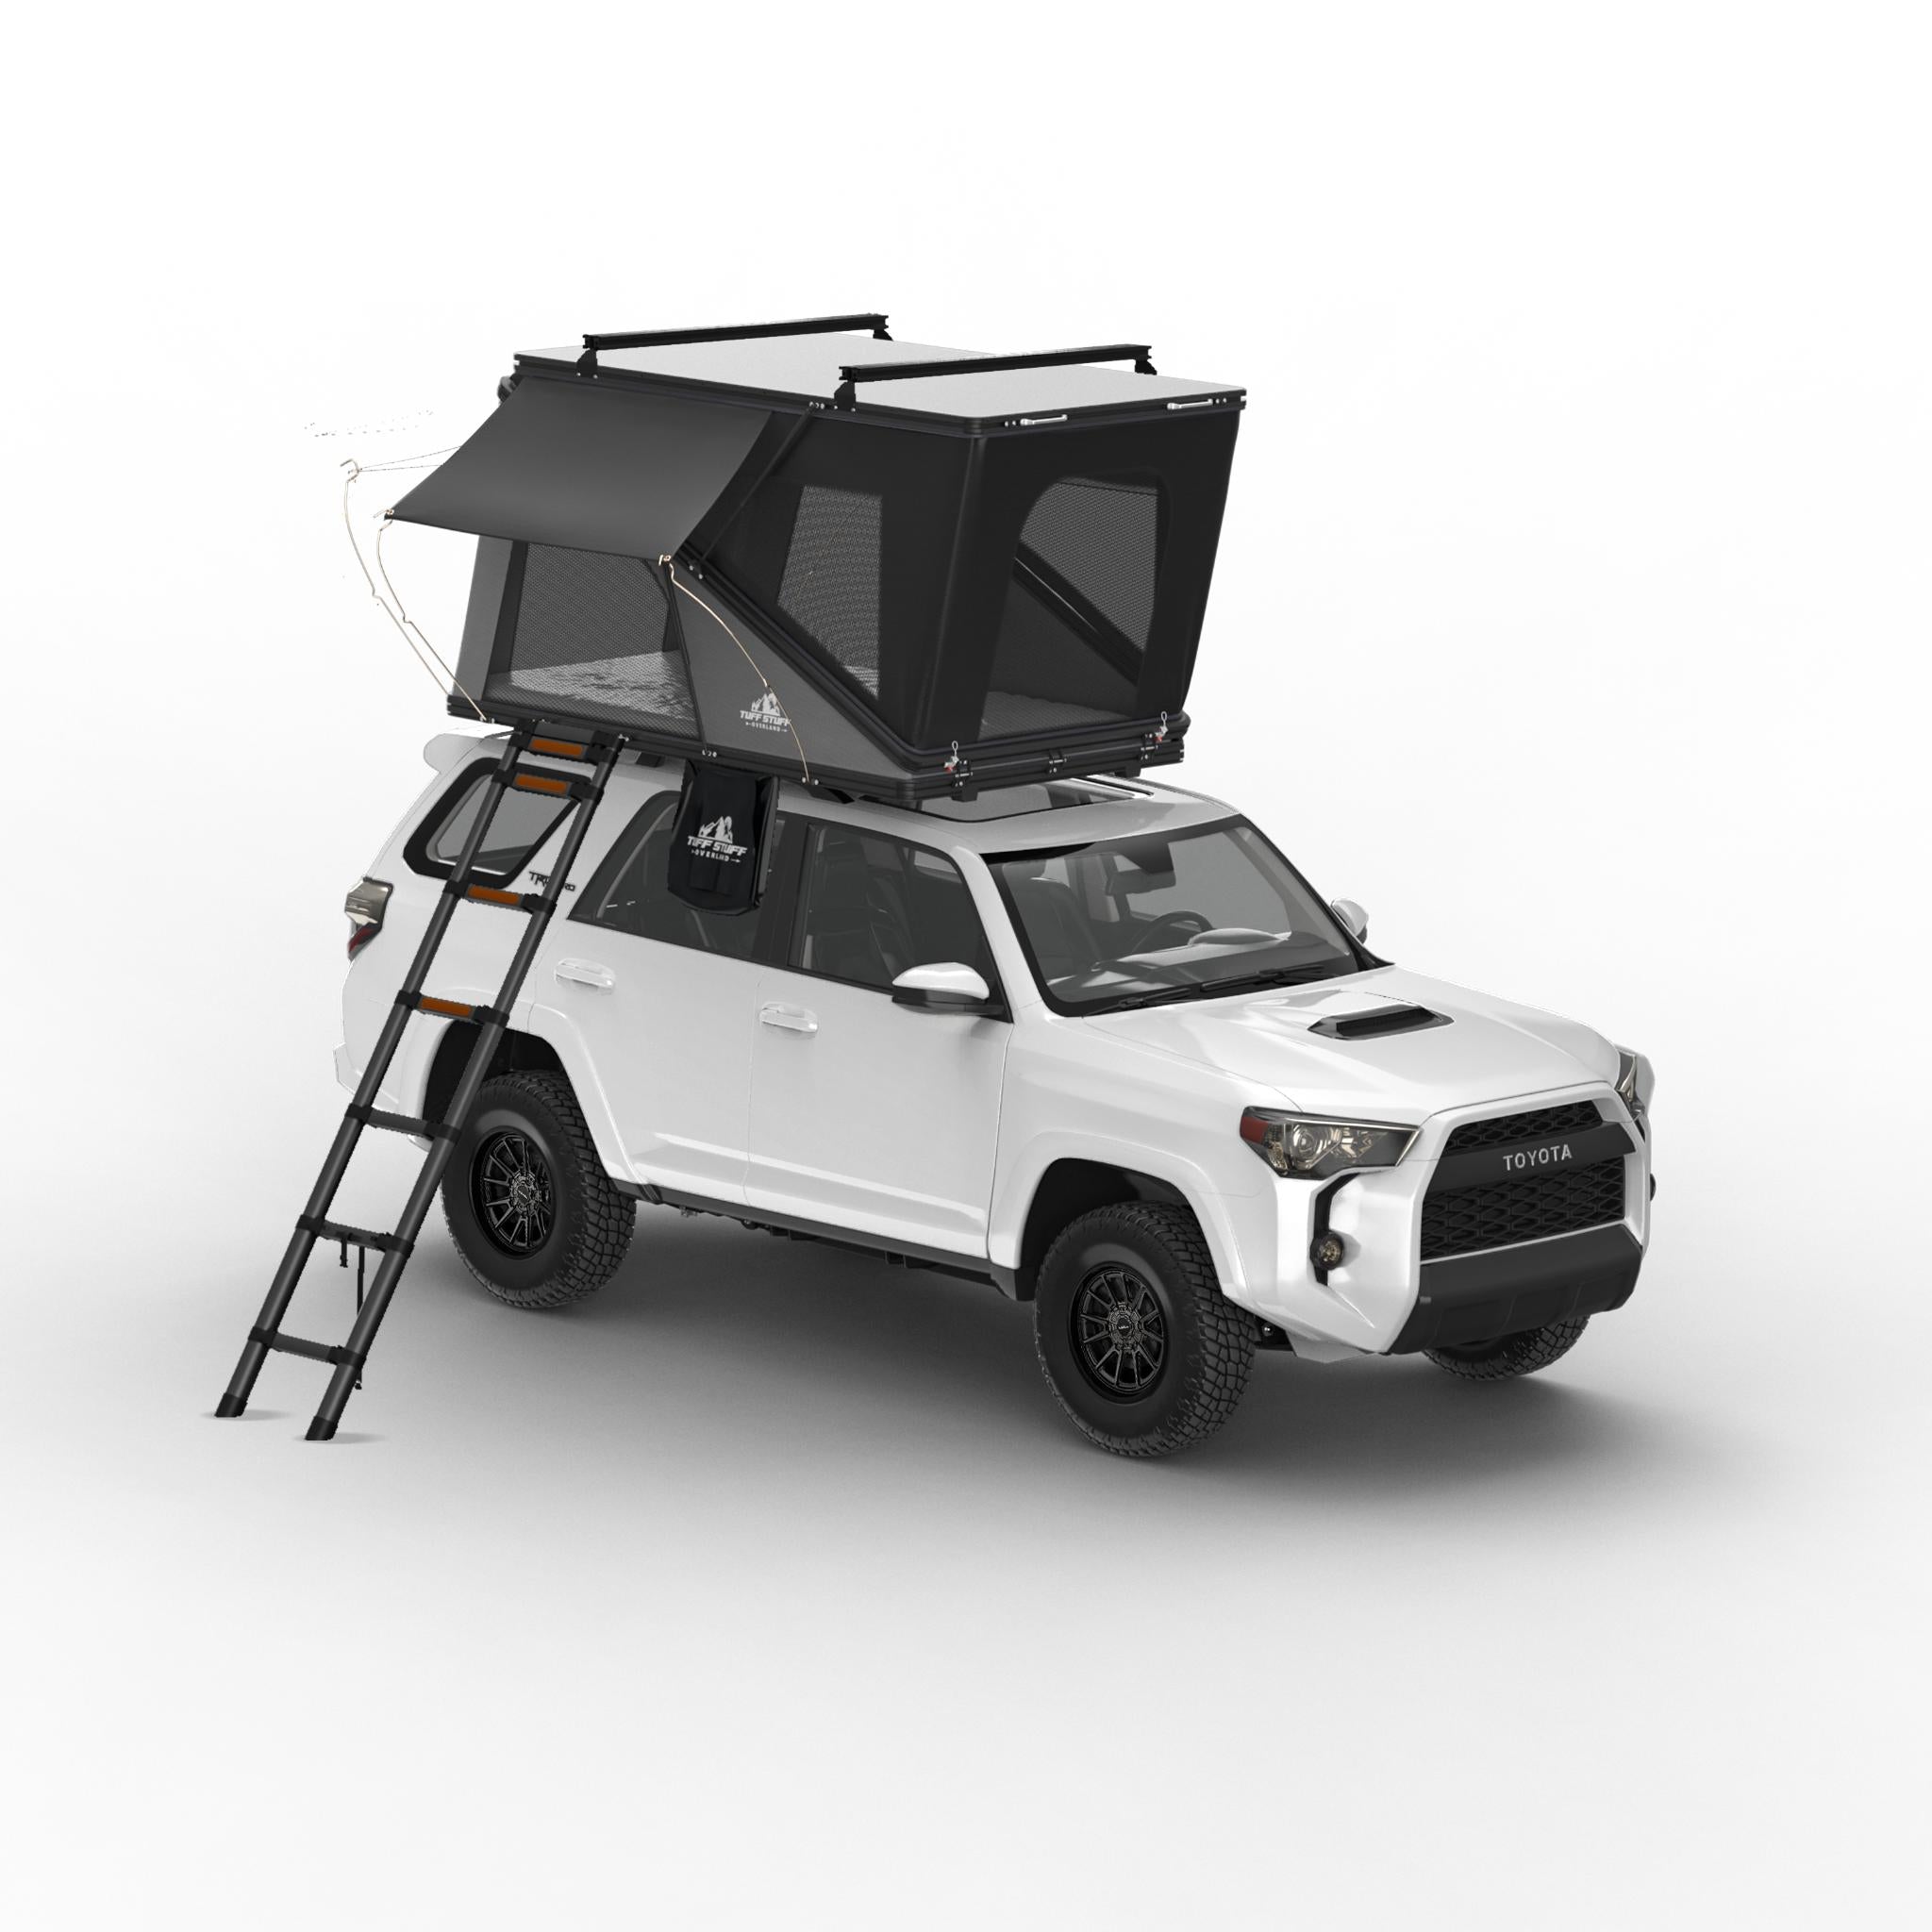
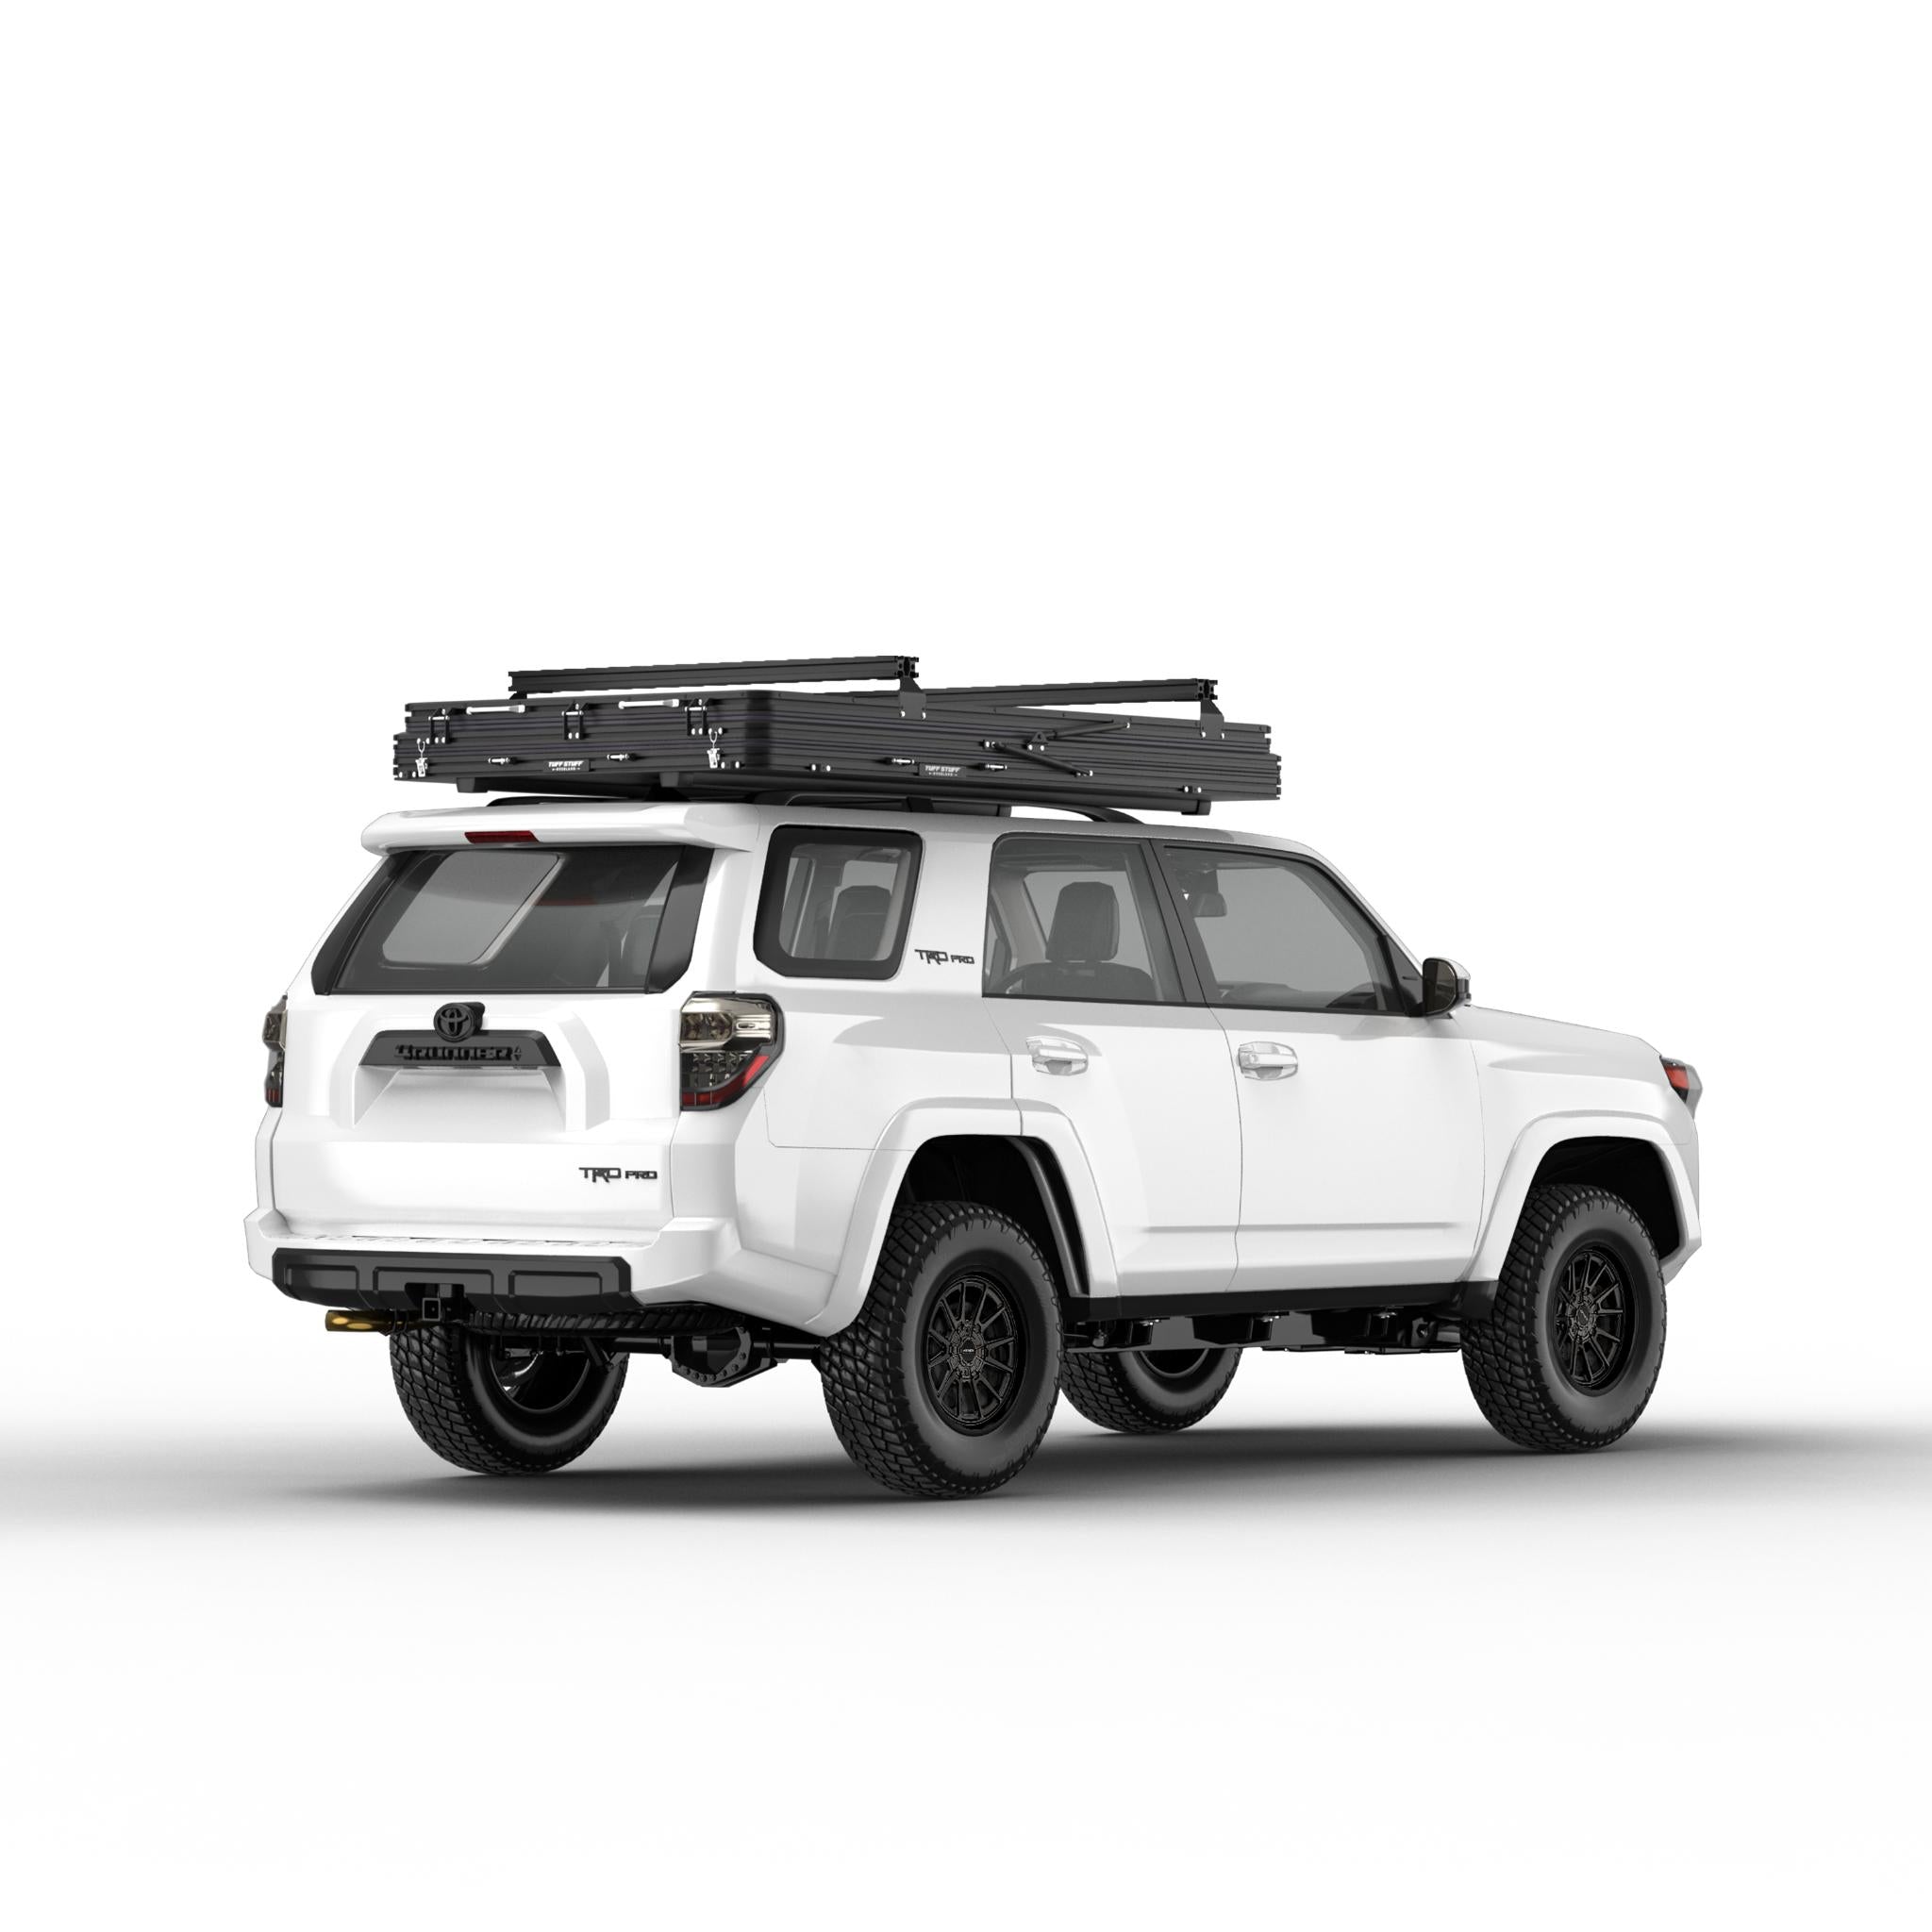
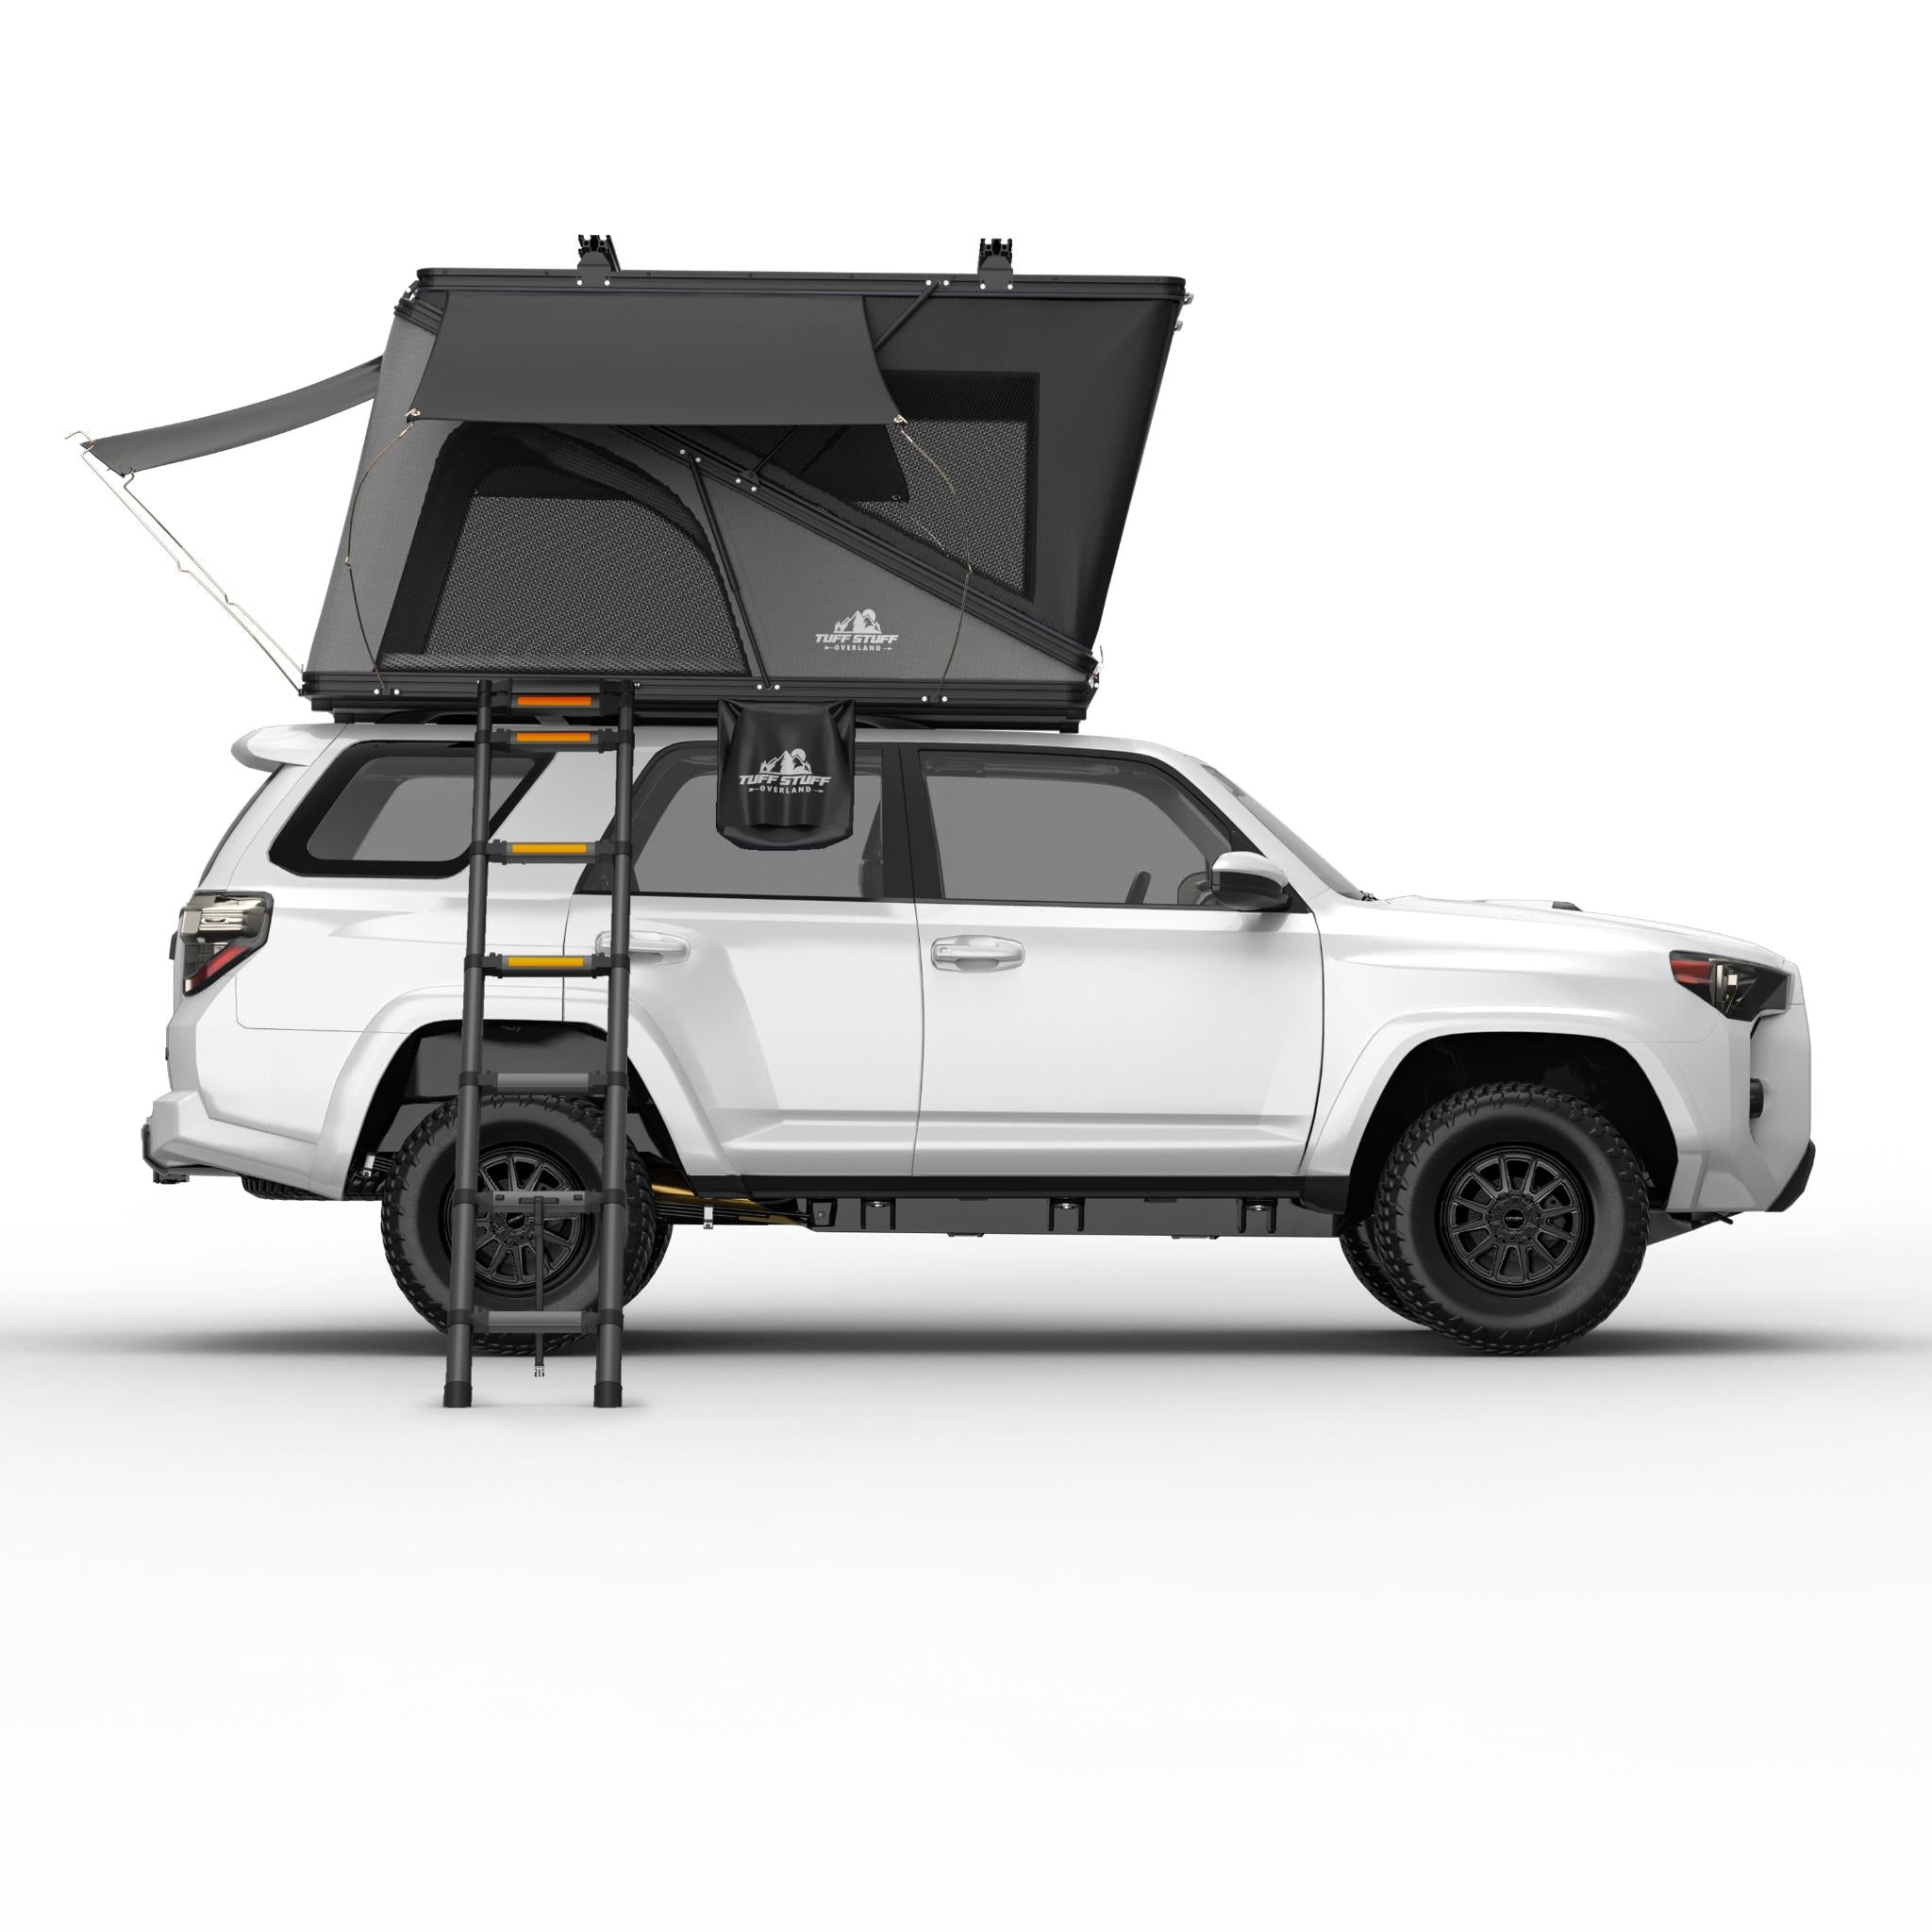
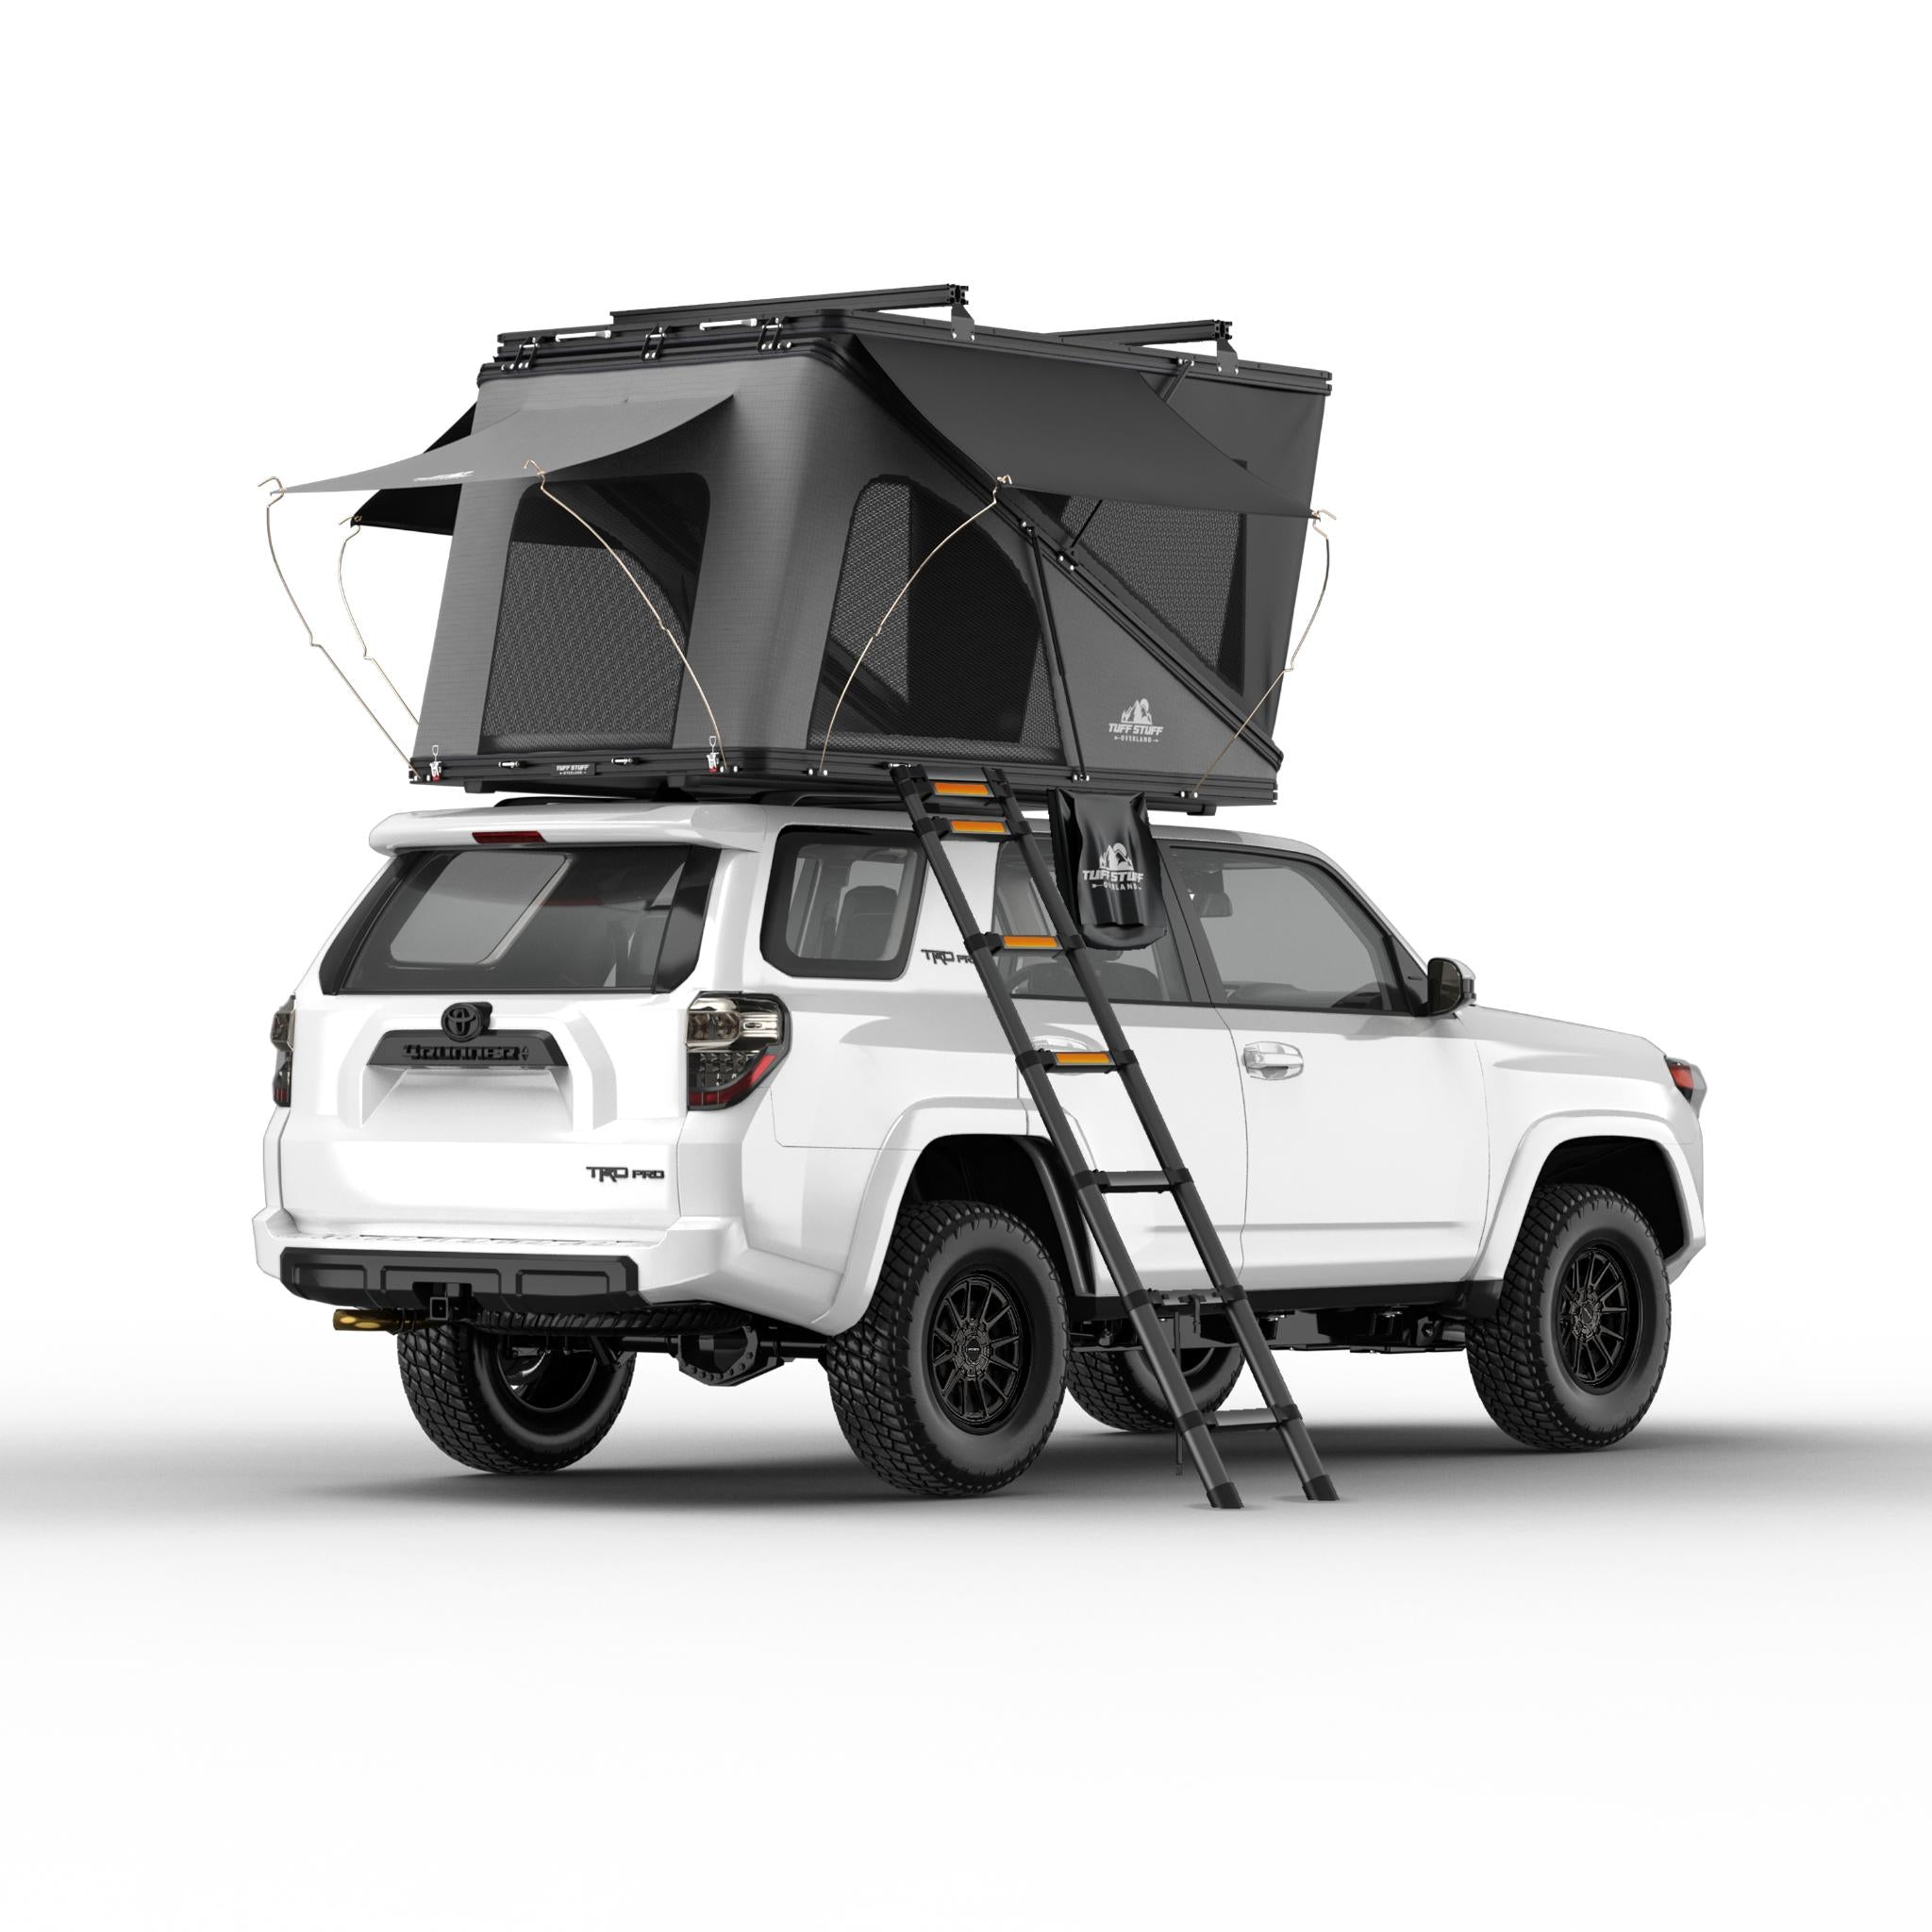
The TUFF STUFF® Alpine 51 Roof Top Tent offers a versatile dual-opening design — choose the rear wedge setup or pop open the front for a full lift and extra mesh-screened windows. With its easy, one-person deployment, you can set up or pack down in about a minute.
Built for four-season adventures, the Alpine features an ultra-durable aluminum shell and premium tent fabric that’s antibacterial, waterproof, and engineered with high tear resistance and superior tensile strength — ready to handle the harshest conditions.
-
- 4 Gas struts allow for dual action opening roof (wedge or pop-up option)
- Roof rack on top of tent (great for kayaks, bikes, and gear)
- Blackout coated fabric (full-screen room with 360-degree visibility to full dark room)
- T-Slot using standard M8 hardware surrounding exterior of tent, 4 T-Slot rails in total (mount awnings, shower tents, water supplies, etc. directly to tent)
- Under 8" slim profile when packed up and latched (excludes additional roof rack height)
- 3 Entryway options based on build (passenger side, driver side, rear)
- Window awnings (removable)
- Mounting hardware & brackets for installation (fits up to 3.25" vehicle cross bars)
- 2.75" thick Memory Foam mattress
- Telescoping ladder with angled steps (will not bite into your arches!)
- Interior LED Light Strip (requires power from a USB power pack, not included)
- Annex room not included, but available soon
-
Sleeping Capacity
-
2 people
Dimensions & Weight
-
Open: 94" L × 51" W × 45" H
-
Closed: 88" L × 51" W × 8" H
-
Roof Pitch: 45"
-
Weight: 248 lbs
-
Weight Capacity: 1,200 lbs
-
Crossbar Load Capacity: 728 lbs
Mattress
-
Memory foam, 1 qty
-
Size: 48" × 85" × 2"
Construction & Materials
-
Shell: Aluminum
-
Tent Fabric: Poly/cotton ripstop 3200 GSM (high tear resistance & tensile strength)
-
Waterproof rating: >3500MM
-
Antibacterial & mold-inhibiting (EPA certified)
-
Blackout coating for total light blocking (“comfy cave” effect)
-
Floor: Heavy-duty 1" aluminum honeycomb
-
Gas Struts: 4 qty, German engineered
Mounting System
-
Tent mounting T-channel rails (bottom): 31.5" apart
-
Sliders: 8 qty (1.13" × 1.75" × 0.25")
-
Flat brackets: 4 qty, adjustable (2.75–3.25")
-
Fits crossbars up to 3.25" wide
-
M8 nuts & bolts: 8 qty (2.25 × 13 mm)
-
Rail caps: 4 qty (2" × 1" × 1.5")
Roof Rack
-
Roof rack bars: 2 qty (50" × 2.5" × 1")
-
Brackets: 4 qty (5" × 4.5" × 4")
-
M8 nuts & bolts: 25 qty (0.38" × 13 mm)
-
Bar caps: 4 qty (1" × 1.3" × 2.5")
Windows & Awnings
-
2 windows with mesh screens & window rods
-
Window awnings: 2 qty (69" × 44" × 33"), removable (zip-off), trapezoid side rain design
-
Window awning bag: 1 qty (14" × 10" × 3")
-
Window rods: 6 qty (35" × 0.25")
-
Window rod bag: 1 qty (36" × 4" × 1")
Hardware & Accessories
-
Security latches: 4 qty (2 front, 2 rear)
-
Telescoping ladder: 103" × 18", angled steps (included)
-
YKK zippers with custom paracord pulls (reduces road noise)
-
LED light strip: White diffused, dimmable (Velcro mount)
-
Shoe bags: 2 qty (13" × 17" × 3")
-
Annex room: Not included, coming soon!
Color
-
Black shell with gray tent fabric
-
Mounting Tent
- Mounting your tent requires a minimum of 2 people for lifting. This Alpine may take three! She's not dainty.
- Position the tent on top of the vehicle's roof rack, bed rack, or trailer, and center it to your liking. If you have a hatchback make sure you have clearance to open the back.
- Using the supplied hardware and mounting plates, slide the hardware into the channel so there are 2 bolts per corner (one in front and one behind the vehicle's crossbars)
- Run the bolts through the holes of the mounting brackets, and thread nuts onto each bolt
- Confirm you are happy with the position of the tent, vehicle balance, and appearance then tighten all nuts to the brackets until the tent cannot move
The Wedge
- Locate the 2 latches at the rear of the tent
- Pull each red latch upward releasing its tension, then unhook the latch from the hook
- Push up on the handles and the tent will rise into a wedge shape on its own
- Locate the elastic cinch strap and pull it upward into the T-slot for storage
- Attach your ladder at the desired entry point
- For detailed ladder instructions, see Alpine Ladder Instructions
- Unzip the screen and fabric covers, rolling them up and securing them with the storage clips
- Deploy the included window awnings (see Window Awning Instructions) and Shoe Bags (see Shoe Bag Instructions)
- Climb into your tent in its wedge form and it’s ready to use
The Pop-Up
- Once your Alpine is in its wedge form, locate the 2 latches at the front of the tent and unlatch them from the frame of the tent
- Push up on the handles to transform the Alpine from a wedge to a full pop-up
- Locate the elastic cinch strap and pull it downward into the T-Slot for storage
- Unzip all the window covers to create a full-screen room, rolling up each fabric cover and securing with the storage clips
- Zip up all the fabric window covers to create a full dark room
- It is seriously dark w/all of the windows and doors zipped up... that sun is not going to ruin your plans to sleep in w/nature a bit.
✅ Be Available – Final delivery is by appointment. Use a phone number you answer. Missed deliveries may incur fees.
✅ Inspect Before Signing – You have 15 minutes. Take photos of all sides of the shipment.
✅ Refuse if Damaged – If the tent is not on a pallet, or if you see visible damage, refuse delivery and call us immediately: 866-220-0171.
✅ Report Hidden Issues Fast – Concealed damage or missing parts must be reported within 72 hours.
ALPINE 51 HARDSHELL ROOFTOP TENT, ALUMINUM, 2 PERSON, BLACK